Corel Draw Copy Objects Around a Circle
In this tutorial we will prove you how to use the PowerClip tool in CorelDRAW for clipping objects, such equally photos, bitmaps and vector objects, and placing them inside other objects, text or frames. Using PowerClip is an piece of cake mode to trim your artwork to a specific shape or size or add artistic effects such as clipping a photo within your text.
Thanks for watching! We hope yous constitute this tutorial helpful and we would love to hear your feedback in the Comments section at the lesser of the folio. You volition detect a written version of this tutorial beneath, and a printable PDF copy and do file to download on the Download Resources tab in a higher place.
Come across what's new in CorelDRAW Graphics Suite!
Download your FREE 15-day trial for Windows or Mac and fuel your creative fire with the new perspective tools, flexible blueprint space, progressive photo editing tools, and much more.
Download these gratuitous resources:
Written tutorial (PDF, 1 MB)
Practise files (Zip file, 6.4 MB)
CorelDRAW Graphics Suite Resources
Quick Beginning Guide (PDF, ii MB)
Keyboard Shortcuts (PDF, 3.five MB)
CorelDRAW User Guide (PDF, 28 MB)
PHOTO-PAINT User Guide (PDF, 26 MB)
What'due south New in CorelDRAW Graphics Suite
CorelDRAW Tools
Clipping Objects into Other Objects Using PowerClip
The PowerClip tool in CorelDRAW allows you to place vector objects and bitmaps, such equally photos, inside other objects, or frames. A frame can be whatsoever object, for case artistic text or a rectangle. Using PowerClip is an easy way to trim your artwork to a specific shape or size or add creative effects such as clipping a photo inside your text.
Click on any of the images below to view full-size.
How to Create a PowerClip Object
Our first exercise is creating a plaid stocking. We have a red stocking and a ruddy plaid pattern. Recall of the stocking as the container that you lot desire to fill with the plaid pattern. There are a few means of clipping objects, such as the plaid pattern into other object, such equally the stocking image.
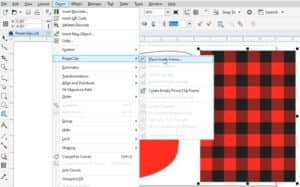
ane. Select the plaid pattern and become toObject >PowerClip >Place Within Frame, or
2. Right-click on the plaid pattern and choosePowerClip Inside
Whichever method y'all choose, you will see that your cursor becomes an arrow. Click with the arrow on the stocking and the plaid design will be clipped inside the stocking shape. And so pressCtrl+Z to disengage if you would similar to effort the tertiary method.
iii. Select the plaid design, click and concord your correct mouse button and drag the pattern about halfway into the stocking shape. Your cursor will get a pocket-size target icon. Release your correct mouse push button and choosePowerClip Inside from the carte that pops upwardly. The pattern volition land in the stocking right where y'all permit it go.

With the first 2 methods, the plaid pattern was automatically centered inside the stocking. But with this 3rd method the pattern is non centered in the stocking. We can brand adjustments by editing the PowerClip object.
How to Edit a PowerClip Object
When you select a PowerClip object a modest toolbar volition announced, usually above or below the object.

This toolbar has options for:
- Edit PowerClip
- Select PowerClip Contents
- Excerpt Contents
- Lock Contents to PowerClip
- Fit Contents
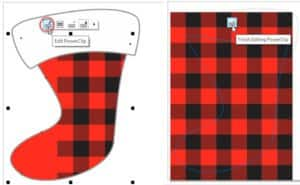
Click on theEdit PowerClip icon and move the plaid blueprint to cover the whole area of the stocking.
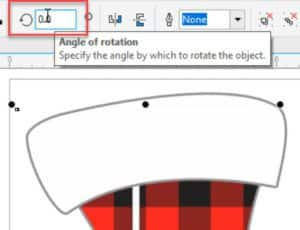
Once you are inEdit PowerClip style, you can resize or reposition the plaid blueprint as you would with whatever object, by dragging the nodes inward or outward. If you click on the plaid design a second time the nodes will change to arrows, allowing yous to rotate the pattern.
So click on theEnd Editing PowerClip icon that appears, to exit the PowerClip.
There are a few other means to edit a PowerClip object:
- Select the PowerClip object and go toObject >PowerClip >Edit PowerClip. Edit as needed. To exit, go toObject >PowerClip >Terminate Editing PowerClip.
- Concord down theCtrl key and click inside the PowerClip object. Edit as needed. To exit, concord downward theCtrl cardinal and click outside the PowerClip object.
- Right-click on the PowerClip object and selectEdit PowerClip. Edit every bit needed. To go out, right-click again and chooseFinish Editing PowerClip.
Now that we reviewed how to add and edit PowerClip, let's expect at how to extract or remove the contents of a PowerClip container. Equally with editing a PowerClip object, there are several methods yous can choose from.
Select the PowerClip object then:
- click on theExtract Contents icon on the PowerClip toolbar, or
- go toObject >PowerClip >Extract Contents, or
- correct-click and chooseExtract Contents.
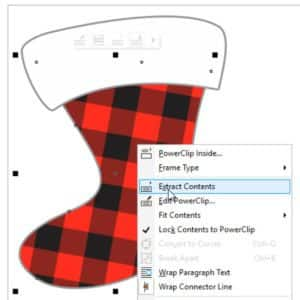
Now elevate the plaid pattern off to the right. You lot volition run across there is an10 inside our previous PowerClip container (stocking). This only indicates that this shape is a PowerClip container.
Note : if you don't desire the stocking (or any other object) to be a PowerClip container anymore, right-click on information technology and chooseFrame Type >None. But to keep with this tutorial, keep information technology as a PowerClip container.
Additional PowerClip Exercises
Now that you lot are familiar with the basics of creating and editing PowerClip objects, here are some additional exercises that volition innovate you to advanced PowerClip features.
Exercise 1: Using the Alt Key
You lot tin can apply theAlt cardinal to edit and movement the contents without going inside the PowerClip object. To demonstrate, we will add some white accents to our plaid blueprint.
- Select theRectangle tool on theTools toolbar and draw tall thin rectangle almost every bit tall as the stocking.
- Switch to thePick tool and click on the white swatch in the Color palette. This will make the rectangle white.
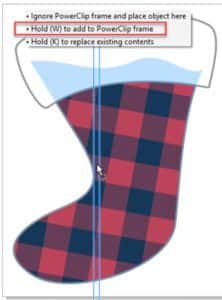
- Drag the rectangle over the plaid blueprint in the stocking but don't release your mouse push. You will see a bill of fare that pops up with some instructions, one of which isConcord (Westward) to add together to PowerClip frame.
- Press theDue west key and then release your mouse button, and the rectangle is added to the PowerClip container.
Note: If you accept assigned theW cardinal as a shortcut primal for another function, the rectangle will still exist added to the PowerClip frame but whatever else you have assigned to theW key will happen too.
- Hold downwards theALT key and click on the plaid blueprint. See that the nodes (handles) go circles instead of squares. This indicates that you are editing inside the PowerClip frame.
- If yous changed the bending of the plaid pattern when experimenting with editing PowerClip objects before in the tutorial, set theAngle of Rotation (in theBelongings bar) back to0. This will make it easier to line upwardly the white accents.
- Hold down theAlt key and select the white rectangle. Make sure the nodes are circular to ensure that you take information technology selected.
- Drag the white rectangle to the centre of one of the plaid rows. You lot can besides use the nodes to make it thinner if you want.
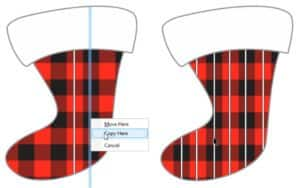
- Hold downward your right mouse push and drag the white rectangle left or correct to the center of another plaid row.
- Release your right mouse push and selectCopy Here. Echo this process to add together equally many white rectangle accents as you want.
Exercise 2: Using a Photograph for a Kitchen Tile Backsplash
Did you know that with a process called sublimation yous can print a photograph, graphic design or artwork on ceramic tiles to create a custom backsplash for your kitchen? Here is how to use the PowerClip tool to set upwards the artwork for this project.
In this exercise nosotros will use a backsplash area of 48" wide by 18" tall, and a tile size of 6"x6".
- On page 2 of the exercise file, fix thePage dimensions to 48" wide 10 18" tall in theHoldingbar.
- Under theView bill of fare, selectSnap to >Folio.
- On theTools toolbar, select theGraph Paper tool in thePolygon tool grouping flyout. In theProperty bar, set the grid size toeightx3.
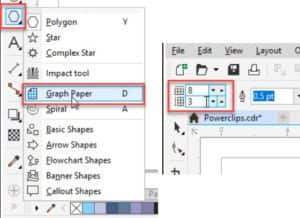
Drag your mouse from the top left corner to lesser right corner to depict out the graph newspaper. The result volition be a filigree of 24 squares.

- Become toFile >Import and browse to the location where you saved the Meadow.jpg photo from the tutorial downloads zip file (or use whatever photograph you wish). ClickImport.
- Again, elevate from the top left corner to bottom correct corner to add together the photo. Make sure some of the grid is withal showing.
- Correct-click on the meadow photo and choosePowerClip Inside. With the pointer, click on one of the grid lines.

The meadow photo is now clipped inside the tile grid. Click on theEdit PowerClip icon in the PowerClip toolbar if y'all need to scale or move the photo to make it cover the entire filigree. Then click on theFinish Editing PowerClip icon.
When you are ready to impress the tiles, click on theUngroup Objects icon in theProperty bar. Now each of your tiles is a separate image that can be printed.

Practice 3: Clipping a Photo Inside Text
You can as well use the PowerClip tool for clipping objects inside text. Go to page iii in the exercise file.
- Right-click on the fire photo and selectPowerClip Inside.
- With the arrow cursor, click on ane of the messages in "Fire Section".
- Click on theEdit PowerClip icon in the PowerClip toolbar, select the burn photograph and use the nodes to resize and reposition the image to fill the text.
- Click on theFinish Editing PowerClip icon and y'all're done!

See what'due south new in CorelDRAW Graphics Suite!
Download your FREE 15-day trial for Windows or Mac and fuel your artistic burn down with the new perspective tools, flexible design infinite, progressive photo editing tools, and much more.
Source: https://learn.corel.com/tutorials/clipping-objects-into-other-objects-with-powerclip/
0 Response to "Corel Draw Copy Objects Around a Circle"
Post a Comment